high beam indicator light
Posted: Tue Aug 01, 2017 11:20 am
Hi all, on 2000 intruder 1400 , just lost my high beam indicator light, I dont see anywhere how to replace it any ideas please? Thank you
Dedicated to all Motorcycle Enthusiasts
https://www.intruders-alert.com/
 [/img]
 [/img]
 [/img]
 [/img]
Hope this fixes the photo links.alexhulett71 wrote:
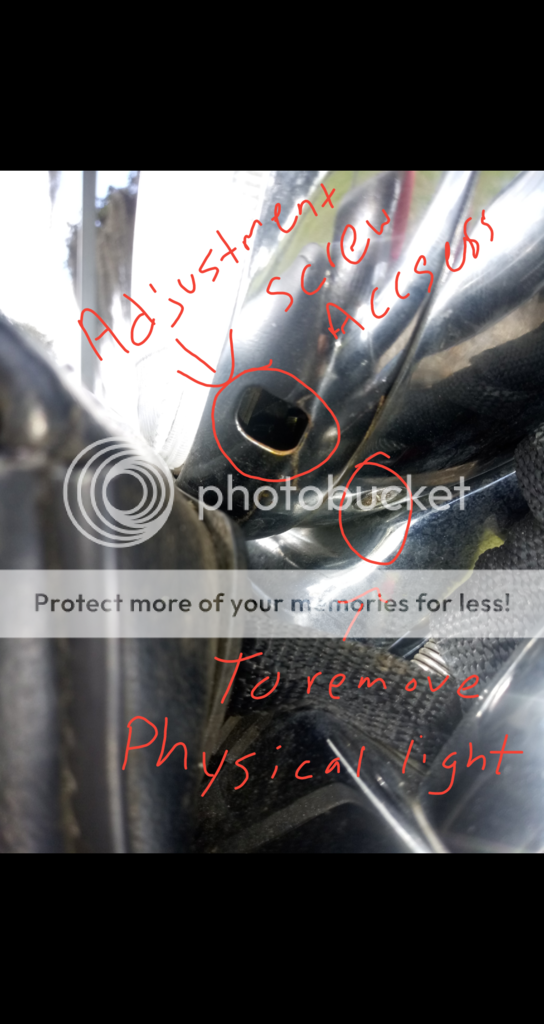
There are a total of 2 screws to remove, one on each side of the bike. This will remove the physical light housing from the front. This will give you access to the light bulb, which is H4 by the way. When you remove the 2 screws, rotate the outer ring clockwise an inch or two and it will pop out.
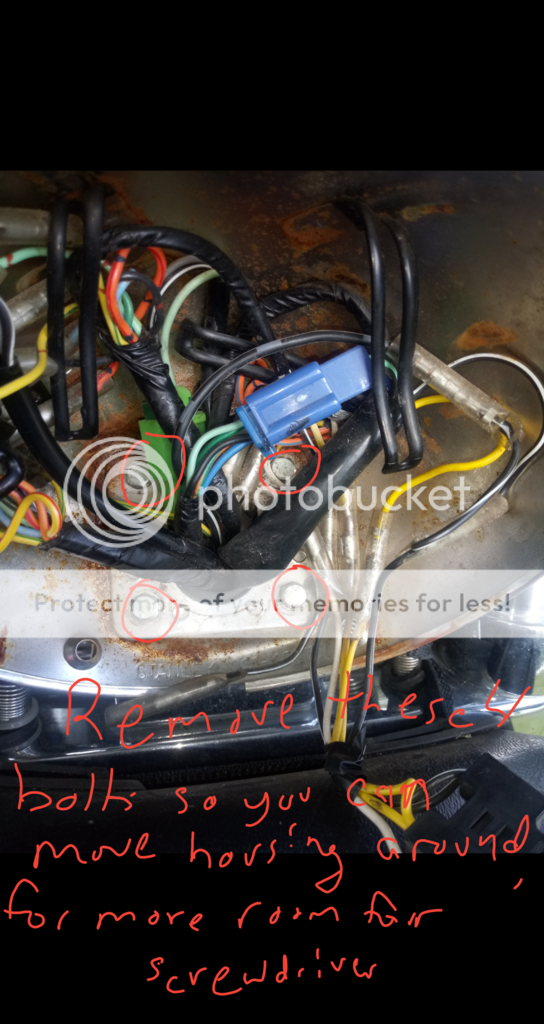
These 4 bolts, which is 8mm by the way, will let you move the headlight bucket around. You will have to be able to move it around to get to some screws.
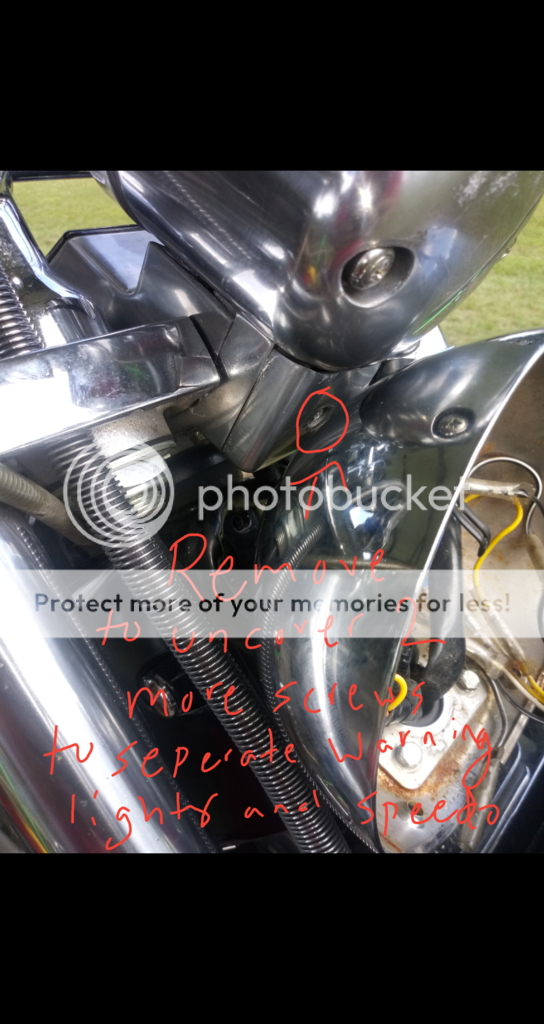
This is just a cover plate, with a single screw that you see. You'll have to be able to move the headlight bucket to remove the screw, at least i did. And i had a 90° bent phillips screw driver that i used as well.
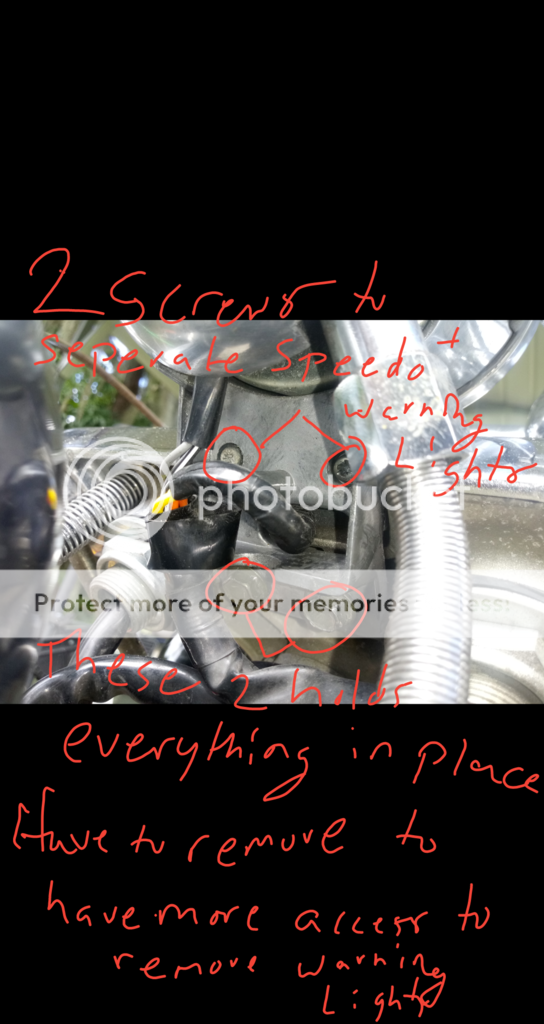
The 2 screws is what holds the warning lights (highbeam, turn, neutral lights bracket thingmabob lol) and the speedo. I tried to only do those 2 screws but i couldnt get the piece out from the tree. So I had to undo the 2 bolts underneath, which is 10 mm. Those 2 bolts is what holds the whole unit to the tree. For these 2 bolts, a swivil became my best friend. I used 1/4 inch stuff btw.
After you pop off the warning lights unit, you can just pull out the bulb sockets, remove the bulb from socket and replace. If it will make you feel better, replace all 4 lights so you know all is new so you dont have to repeate the process again shortly down the road maybe. Or you can just replace the burnt out bulb and have the extra on hand, usually comes in packs of 2.
To put pack together, just reverse the process. For the speedo and warning light unit, put the wl unit in place, to sit there but do not try to screw them together. First, put the 2 bolts in and dont tighten until you get both in and then screw the speedo and warning light unit together. And just follow threw with the rest, it will be self explanatory to do since you took it apart.
I know im 2 years late to this tread, but id figure id share since there is this thread anyways instead of making a new. And i tried for the images to come threw but hopefully you can see them on the links, i know theyre there
If you click on the quote link to reply to my post you will see where I took out all the url links and just retained the img links. It can be a bit tricky when you copy the image from Photo bucket because it includes the url and img links together and sometimes it doesn't work.alexhulett71 wrote:Thank you hillsy. That was the first time ive posted pics on here and made a photobucket account for it. I dont know where i went wrong with it, as im not too literate when it comes to stuff like that.
Thanks, now ill know for future refrence. I knew i couldnt upload directly here as to why i went with photobucket.hillsy wrote:If you click on the quote link to reply to my post you will see where I took out all the url links and just retained the img links. It can be a bit tricky when you copy the image from Photo bucket because it includes the url and img links together and sometimes it doesn't work.alexhulett71 wrote:Thank you hillsy. That was the first time ive posted pics on here and made a photobucket account for it. I dont know where i went wrong with it, as im not too literate when it comes to stuff like that.