New rider in Seattle
-
sgtcall
- BIKE REPOED!
- Posts: 2836
- Joined: Sun Apr 03, 2016 5:59 pm
- My Bike: Triumph Bonneville Speedmaster
- Location: Stranded in New Jersey
Re: New rider in Seattle
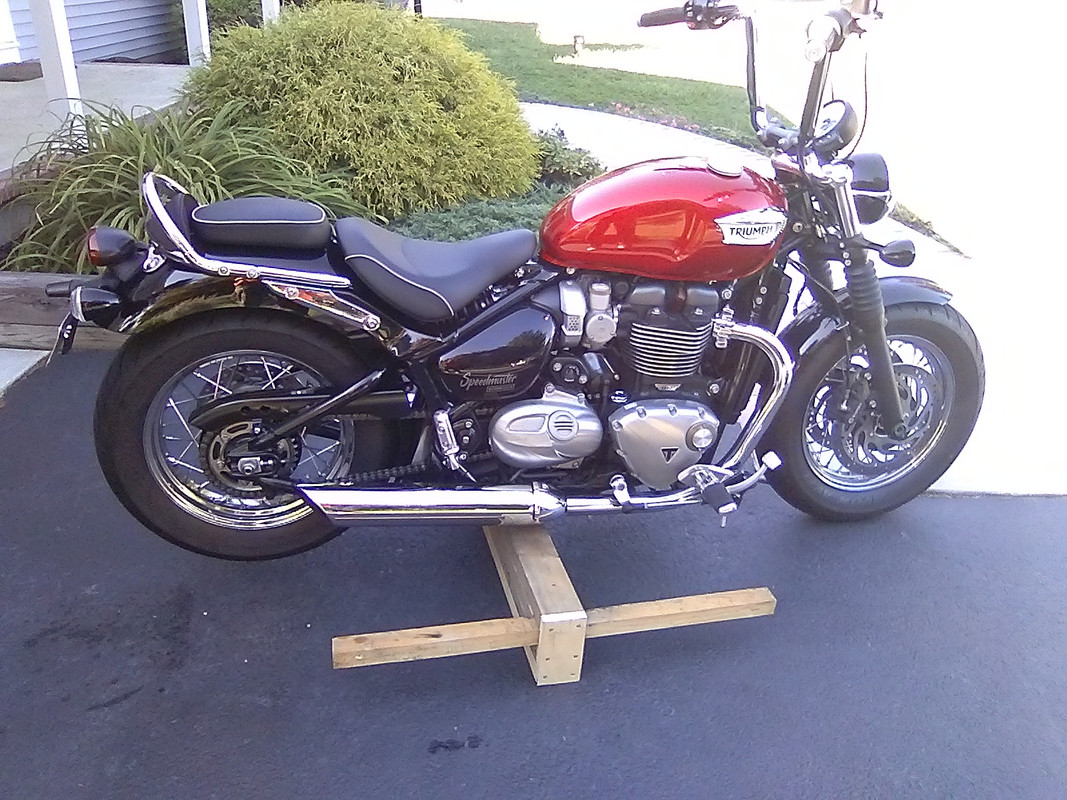
Mine lift is easy to use and once the bike is on the lift it just sits there with no wobble at all. On the lift I made for the intruder I had eye bolts in the top so I could run ratchet straps to hold it in place. I only used the straps if I was ding something that required more work. I have not added them to this one yet because all I really need to do to the Triumph is change fluids and wax the chain. I did add an old piece of carpet to the lift after the picture was taken just to protect the frame but soft wood doesn't really hurt it anyway. If you need the front wheel up you just move the lift more to the front so it works for both wheels.
If you have any type of electrical issue, have your battery load tested before you do anything else. Any auto parts store will test it for free.
-
bdschultz

- Practicing Bicycling
- Posts: 49
- Joined: Tue Apr 09, 2024 3:23 am
- My Bike: 1986 Suzuki Intruder VS700GL
Re: New rider in Seattle
Lots of great advice on jacks and lifts here, thanks all.
Ultimately I'll probably get a proper jack but for the time being I'm going to head out to the garage and make a temporary one out of lumber, because...
I may have my first issue, which is: I noticed there is no daylight between my front brake pads and the rotor. After some preliminary digging, sounds like some pad contact is expected, that it's really more about whether the wheel spins freely (a.k.a., rotates a handful of times before coming to a stop).
Would love to have you all weigh in on this. The service manual doesn't seem to have much information in the way of adjustments or tolerances when it comes to this scenario.
Also - took my maiden voyage this morning! Felt like a newborn calf trying to walk out there but I had a blast!
-
Designer
- Joined a 1200cc Club
- Posts: 17743
- Joined: Tue Sep 16, 2014 8:34 am
- My Bike: Two 1400 Custom Made Choppers
Re: New rider in Seattle
Yes, since the Pads are not attached to the Pistons, they will not fully retract. Thus there will be some sort of Pad-to-Rotor contact. Just so long as the Wheel spins freely, (when on the Stand to test this) you don't hear any weird noises, you should be just fine.bdschultz wrote: ↑Sun Apr 28, 2024 10:46 amI may have my first issue, which is: I noticed there is no daylight between my front brake pads and the rotor. After some preliminary digging, sounds like some pad contact is expected, that it's really more about whether the wheel spins freely (a.k.a., rotates a handful of times before coming to a stop).
Would love to have you all weigh in on this. The service manual doesn't seem to have much information in the way of adjustments or tolerances when it comes to this scenario.
GREAT!
Soon you will be grinning ear-to-ear and lovin' the whole experience.
Time To Ride Country Two Laners.
CENSORSHIP IS WHAT TYRANTS RESORT TO WHEN THEIR LIES LOOSE THEIR POWER.
Si vis pacem, para bellum!
-
sgtcall
- BIKE REPOED!
- Posts: 2836
- Joined: Sun Apr 03, 2016 5:59 pm
- My Bike: Triumph Bonneville Speedmaster
- Location: Stranded in New Jersey
Re: New rider in Seattle
Intruder brake pads are easy, you don't even need to lift the bike. The only real tools you need are needle nose pliers and something to compress the pistons ( always used angle nose pliers and the old pad, let the hate begin, sometimes I used a C clamp). Just pull the cover off the caliber and then pull the cotter pins. The retaining bar slides right out then pull the pads. Compress the pistons and put new pads in.
If you have any type of electrical issue, have your battery load tested before you do anything else. Any auto parts store will test it for free.
-
bdschultz
- Practicing Bicycling
- Posts: 49
- Joined: Tue Apr 09, 2024 3:23 am
- My Bike: 1986 Suzuki Intruder VS700GL
Re: New rider in Seattle
Thank you, sgtcal, big help.sgtcall wrote: ↑Sun Apr 28, 2024 1:14 pmIntruder brake pads are easy, you don't even need to lift the bike. The only real tools you need are needle nose pliers and something to compress the pistons ( always used angle nose pliers and the old pad, let the hate begin, sometimes I used a C clamp). Just pull the cover off the caliber and then pull the cotter pins. The retaining bar slides right out then pull the pads. Compress the pistons and put new pads in.
I almost did exactly this, because the procedure for hydraulic brakes on bicycles is almost identical. I'll push the pistons with a small piece of plastic, rigid foam, etc. - something softer.
The pads themselves seem healthy, so I'll probably just clean them up a bit and reinstall.
-
Designer
- Joined a 1200cc Club
- Posts: 17743
- Joined: Tue Sep 16, 2014 8:34 am
- My Bike: Two 1400 Custom Made Choppers
Re: New rider in Seattle
I do a similar method to press back the Piston. I use a piece of Wood Shim (it's thin enough to fit there) that fits against the Rotor and then use a small Pry Bar to push the Piston back.sgtcall wrote: ↑Sun Apr 28, 2024 1:14 pmIntruder brake pads are easy, you don't even need to lift the bike. The only real tools you need are needle nose pliers and something to compress the pistons ( always used angle nose pliers and the old pad, let the hate begin, sometimes I used a C clamp). Just pull the cover off the caliber and then pull the cotter pins. The retaining bar slides right out then pull the pads. Compress the pistons and put new pads in.
But first!...I check the Fluid Level of the Master Cylinder and use a old Turkey Baster to remove excess. So that when Both Pistons are pushed back, I don't have the excess Brake Fluid resisting the Pistons movement and/or Leaking out and all over things like Paint and stuff.
Time To Ride Country Two Laners.
CENSORSHIP IS WHAT TYRANTS RESORT TO WHEN THEIR LIES LOOSE THEIR POWER.
Si vis pacem, para bellum!
-
hillsy v2
- Bike out of hock
- Posts: 3342
- Joined: Wed Jul 27, 2022 5:35 pm
- My Bike: Too many to list
Re: New rider in Seattle
Make sure you don't have crud or rust on the pistons before you push them back into the caliper - you might end up with leaking seals if you do.
-
FallenAngel

- Joined a 950cc Club
- Posts: 2353
- Joined: Wed Apr 06, 2016 1:37 am
- My Bike: Suzuki Intruder 1400
- Location: Seattle,Wa
Re: New rider in Seattle
Crack the bleeder open
Catch the old fluid in a bottle
You dont want to contaminate your brake fluid with the fluid that has been cooking in the caliper
Then flush with new fluid
Catch the old fluid in a bottle
You dont want to contaminate your brake fluid with the fluid that has been cooking in the caliper
Then flush with new fluid
-
hillsy v2
- Bike out of hock
- Posts: 3342
- Joined: Wed Jul 27, 2022 5:35 pm
- My Bike: Too many to list
Re: New rider in Seattle
Yeah - this is probably the best thing to do. Don't even bother trying to push the piston back in - just flush out the old fluid.FallenAngel wrote: ↑Sun Apr 28, 2024 4:41 pmCrack the bleeder open
Catch the old fluid in a bottle
You dont want to contaminate your brake fluid with the fluid that has been cooking in the caliper
Then flush with new fluid
-
sgtcall
- BIKE REPOED!
- Posts: 2836
- Joined: Sun Apr 03, 2016 5:59 pm
- My Bike: Triumph Bonneville Speedmaster
- Location: Stranded in New Jersey
Re: New rider in Seattle
But never empty the fluid. Replace from the top as you go. If you get air in the lines it is a PIA to get out.
If you have any type of electrical issue, have your battery load tested before you do anything else. Any auto parts store will test it for free.
-
navigator
- Joined a 1100cc Club
- Posts: 5575
- Joined: Thu Dec 29, 2016 12:33 pm
- My Bike: VS800
Re: New rider in Seattle
Change the fluid annually, condensation will turn it brown.
Remove the fluid from the master with a turkey baster, wipe it clean. Don't touch the lever.
Refill with fresh fluid, bleed the line.
Have a beer and admire your work. JMO
Remove the fluid from the master with a turkey baster, wipe it clean. Don't touch the lever.
Refill with fresh fluid, bleed the line.
Have a beer and admire your work. JMO
-
Designer
- Joined a 1200cc Club
- Posts: 17743
- Joined: Tue Sep 16, 2014 8:34 am
- My Bike: Two 1400 Custom Made Choppers
Re: New rider in Seattle
These ^^^^
Time To Ride Country Two Laners.
CENSORSHIP IS WHAT TYRANTS RESORT TO WHEN THEIR LIES LOOSE THEIR POWER.
Si vis pacem, para bellum!
-
bdschultz
- Practicing Bicycling
- Posts: 49
- Joined: Tue Apr 09, 2024 3:23 am
- My Bike: 1986 Suzuki Intruder VS700GL
Re: New rider in Seattle
Thanks, sgtcall. I watched this video: https://www.youtube.com/watch?v=0_6jUWC6vtw
Fella's head is in the way but his process is clear and he also emphasizes keeping the reservoir full, or at least avoiding emptying it entirely. The Part 1 video is basically prep (covering bike, tools, etc.)
Any critiques of his method?
-
bdschultz
- Practicing Bicycling
- Posts: 49
- Joined: Tue Apr 09, 2024 3:23 am
- My Bike: 1986 Suzuki Intruder VS700GL
Re: New rider in Seattle
Thanks, nav. Good advice, all around.
-
bdschultz
- Practicing Bicycling
- Posts: 49
- Joined: Tue Apr 09, 2024 3:23 am
- My Bike: 1986 Suzuki Intruder VS700GL
Re: New rider in Seattle
Thanks, FA.FallenAngel wrote: ↑Sun Apr 28, 2024 4:41 pmCrack the bleeder open
Catch the old fluid in a bottle
You dont want to contaminate your brake fluid with the fluid that has been cooking in the caliper
Then flush with new fluid
-
bdschultz
- Practicing Bicycling
- Posts: 49
- Joined: Tue Apr 09, 2024 3:23 am
- My Bike: 1986 Suzuki Intruder VS700GL
Re: New rider in Seattle
Thanks, Designer. Looks like I'm off to the thrift store for a turkey baster.Designer wrote: ↑Sun Apr 28, 2024 2:21 pmI do a similar method to press back the Piston. I use a piece of Wood Shim (it's thin enough to fit there) that fits against the Rotor and then use a small Pry Bar to push the Piston back.sgtcall wrote: ↑Sun Apr 28, 2024 1:14 pmIntruder brake pads are easy, you don't even need to lift the bike. The only real tools you need are needle nose pliers and something to compress the pistons ( always used angle nose pliers and the old pad, let the hate begin, sometimes I used a C clamp). Just pull the cover off the caliber and then pull the cotter pins. The retaining bar slides right out then pull the pads. Compress the pistons and put new pads in.
But first!...I check the Fluid Level of the Master Cylinder and use a old Turkey Baster to remove excess. So that when Both Pistons are pushed back, I don't have the excess Brake Fluid resisting the Pistons movement and/or Leaking out and all over things like Paint and stuff.
-
bdschultz
- Practicing Bicycling
- Posts: 49
- Joined: Tue Apr 09, 2024 3:23 am
- My Bike: 1986 Suzuki Intruder VS700GL
Re: New rider in Seattle
Finally got around to making one of these, totally did the job.sgtcall wrote: ↑Sat Apr 27, 2024 2:47 pmI still use a home made lift that has never failed me. I think I invested about $5.00 in it. Plenty of videos on Youtube of how to build one and how it works.bdschultz wrote: ↑Sat Apr 27, 2024 2:38 pmAnyone have recommendations for a jack or scissor lift, preferably under $100?
Also, I'm all ears on alternate solutions. I want to avoid Macguyvering (lots of) straps to the ceiling, stacking wood, etc. Looking for something rock solid with minimal fuss.
Thanks all.
On that note, while there's still rubbing on the rotor, the wheel seems to be spinning pretty well, so I may hold off on changing out the fluid. Indicator window shows it looking full and clear, and the previous owner (who was meticulous) said all the fluids should be good for a while.
Probably going to do an oil change and leave the rest until fall/winter.
-
Designer
- Joined a 1200cc Club
- Posts: 17743
- Joined: Tue Sep 16, 2014 8:34 am
- My Bike: Two 1400 Custom Made Choppers
Re: New rider in Seattle
This all makes good sense.bdschultz wrote: ↑Wed May 01, 2024 5:13 pmFinally got around to making one of these, totally did the job.
On that note, while there's still rubbing on the rotor, the wheel seems to be spinning pretty well, so I may hold off on changing out the fluid. Indicator window shows it looking full and clear, and the previous owner (who was meticulous) said all the fluids should be good for a while.
Probably going to do an oil change and leave the rest until fall/winter.
Go For It! And Ride.
Time To Ride Country Two Laners.
CENSORSHIP IS WHAT TYRANTS RESORT TO WHEN THEIR LIES LOOSE THEIR POWER.
Si vis pacem, para bellum!
-
sgtcall
- BIKE REPOED!
- Posts: 2836
- Joined: Sun Apr 03, 2016 5:59 pm
- My Bike: Triumph Bonneville Speedmaster
- Location: Stranded in New Jersey
Re: New rider in Seattle
Intruders always have a little rubbing on the rotor so you will hear some noise. You learn to live with it.
If you have any type of electrical issue, have your battery load tested before you do anything else. Any auto parts store will test it for free.
-
FallenAngel
- Joined a 950cc Club
- Posts: 2353
- Joined: Wed Apr 06, 2016 1:37 am
- My Bike: Suzuki Intruder 1400
- Location: Seattle,Wa
Re: New rider in Seattle
Your pads will always make contact with the rotorsbdschultz wrote: ↑Wed May 01, 2024 5:13 pm
On that note, while there's still rubbing on the rotor, the wheel seems to be spinning pretty well, so I may hold off on changing out the fluid. Indicator window shows it looking full and clear, and the previous owner (who was meticulous) said all the fluids should be good for a while.
Probably going to do an oil change and leave the rest until fall/winter.
This helps to keep your rotor clean and the contact is minimal